Search Engine

Custom Search

Monday, December 21, 2009

Christmas Waves Wordart


The are all black or grey, however I added a glitter sheet. To add a bit of glitz to your wordart, drag and size the wordart into your layout.
  1. Now drag the glitter into the layout and crtl+g (group the layers together).
  2. Add a new layer and crtl+g. Fill this layer with the color you would like.
  3. Set the layer style to hard light. (In the preview top left.)
  4. If you are using a dark color and would like a deeper color...
  5. Click Enhance>adjust color>color variations and click darken 3 times.
  6. Lock the 3 layers together by clicking on the wordart layer, you see an eye, in the same column as the eye, for both the glitter layer and color layer click and a lock will show.
  7. Now click Layer>merge visible.
Thanks Judith for all your contributions this year. And thank you all for taking the time to leave a note. I really enjoy reading them.

Friday, December 18, 2009

Merry Christmas


Merry Christmas.

Thursday, December 17, 2009

Berry Set


Berry Wreath and Garland.

Tuesday, December 15, 2009

Pine Wreath


 Pine Wreath and Garland. Thanks for the nice comments. These sets seemed to be something you might be able to use will a lot of different things. So I thought they could be loaded separately, and tomorrow the berries and we'll be finished. Thank you all for leaving the nice comments. Have fun.

Monday, December 14, 2009

Holly Wreath and Border


Holly Wreath and Garland.

Sunday, December 13, 2009

Gingerbread Alpha


Gingerbread Alpha. It includes the lowercase, punctuation and numbers. They are all "iced" slightly differently. And for Keryn, who taught me that Santa uses "Boomers", a couple of arrows for her and the rest of you down under. (I hope they'll eat feed corn.) Anyone who needs the arrows in a different language or tradition, leave a note and I'll make them up for you.

Saturday, December 12, 2009

Milk and Cookies


Milk and Cookies. (I thought it would be fun to included the reindeer.) Hello to our new friends. You may be interested in last years Gingerbread House made by my grandson, in case you need another. He and grandpa have had a competition ongoing all year, between his gingerbread house and grandpa's 62 Impala template. The number of downloads of each of their idea's put him ahead. Of course it was loaded months before grandpa's and has a much broader use, but still it is fun for them. I should remind them that I did the work, but it's probably more fun their way.

Thursday, December 10, 2009

Hanukkah


 Hanukkah.
We have a lovely time last night at the girls Winter Band Concert. It's been frightfully cold, so I'm off to find some wool socks for my hubby. He complained that his feet were so cold yesterday that they hurt. Wish me luck on the hunt.
  1. To make the candles to appear to be in the Menorah, position them behind or in the lower layers of the palette.
  2. Click on the Menorah layer.
  3. Select the brush tool and pick a hard edge round brush, sizing it to the same width of the candle at the edge were it touches the Menorah.
  4. Looking closely at the Menorah and the back of the candle cup will be erased to the width of the candle, but not the front edge of the candle cup.
  5. It you erased to much click Edit>undo eraser. Have fun.

Monday, December 7, 2009

Foiled Alpha


Foiled Alpha.

Saturday, December 5, 2009

Frosty Mornings


Frosty Morning. Off to build a ginger bread house.

Thursday, December 3, 2009

Fuzzy Alpha


Fuzzy Alpha. I thought this looks a bit like the fur on Santa's suit. These are all a bit irregular as they are all "handmade" from a piece of ? Well I think I'll let you wonder, it'll be fun.

Tuesday, December 1, 2009

From My Window

From My Window.
Judith had sent this gorgeous deer visiting her backyard. It would please me if you took a moment to thank her for her contribution. There is one deer but I wanted to remind some of the gals that are newer that an object can be turned. Have Fun.

Sunday, November 22, 2009

Announced by the Trumpets


Announced by the Trumpets. And thanks to Judith for all her lovely word art. I was thinking that we are all a bit busy this week. I'll post some things for commercial use. Mostly things I have already used and probably won't use again. I have finished a gorgeous deer that Judith sent and we will start again with something geared towards outdoor pages. Have fun.

Friday, November 20, 2009

Give Thanks


Learning how to cluster objects is important. We have all seen cluster in previews of kit, or quick pages. The point is to draw the eye in. Generally your cluster will look better in odd numbers. Important to remember that things don't have to be used as intended. The stem laying in a horizontal manner appears now as a ribbon or border. Add the one berry sprig and it starts changing the look immediately, although a few well placed would have added balance. If adding a few flowers (below left), makes the layout seem more feminine than excluding them, more masculine (below right).
Give Thanks.

Tuesday, November 17, 2009

Big Top


 Big Top.
And I received an email from Jackie at La galerie de Jackie, with an award! Thanks so much. Her blog is filled with her digital artwork. So let's give this a try. I must pass it onto 10 people and reveal 10 things about myself. So I decided to visit all your blogs today (If you've left a comment). Of course a lot of the blogs were family sites, and you all have lovely families. But I did restrict the list to things we can use.
And the award goes to...
  1. http://www.gypsyrose-myblog.blogspot.com/ for card ideas
  2. http://www.sus-xandersmom.blogspot.com/ for Quick pages
  3. http://www.donnasdigitalcreations.blogspot.com/ for Wordart
  4. http://www.themagnoliapatch.blogspot.com/ a template available
  5. http://www.justbeingcrafty.blogspot.com/ Fall Quick pages
And the revealing...
  1. I have been married most of my life.
  2. I think grandchildren are the BEST part of life.
  3. I love to scrapbook.
  4. I enjoy gardening.
  5. I enjoy cooking.
  6. I like to read history.
  7. I like to rake leaves.
  8. I don't like to drive.
  9. I drink to much coffee.
  10. My parents taught me, that if you fall off the horse, get up, dust yourself off and get back on. It seems like a good lesson for life.

Saturday, November 14, 2009

Tiled Alpha

Tile Alpha. I included the 2 tile trays shown and also a second piece for the front rail. It allows you to have the letters "set back in" the tray. Maybe somebody would like to use it for game photo's and not just an alpha. Have fun.

Thursday, November 12, 2009

Happy Birthday


Happy Birthday and the Birthday Cake.
In the preview the green frame was duplicated, the lower layer filled with color and the 5 typed, you can type journaling or dates or ?. Elements don't have to be always used as intended. Have fun.

Tuesday, November 10, 2009

Photoshop Lesson

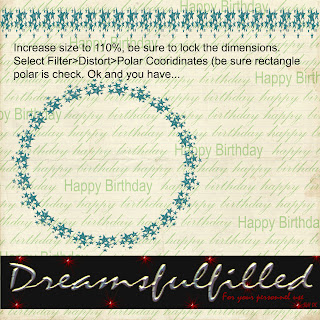
I missed the opportunity to post this, so here we go. You can use any straight element (ribbons and borders) and turn it into a frame or place for your journaling with the polar coordinates filter. If you right click and you can save the photo to your computer (if you want).
  1. Open a new layout, it really should be 12 x 12 inches, so that there is enough room for the filter to work properly.
  2. Click Filter>Distort>Polar Coordinates (at the top) and you are done.
  3. HOWEVER, some elements are not wide enough to connect properly, as was the case of the barbed wire frame, since I was layering them, I just turned the second layer a bit and covered the small gap. BUT if you are not doing that, to correct the gap increase the file to 110% and lock the dimensions together and run the filter in step 2.
  4. Have fun.

Sunday, November 8, 2009

Friday, November 6, 2009

Clear Date Labels


Clear Date Labels. On the top label, I just made a new layer under the label, and used a brush to "stamp" , highlighting the date. All the markers are in red, however we had a lesson in changing colors. Drag it into your layout, click Enhance>Adjust Color>Adjust Hue/Saturation and move the slider to achieve the color you would like. Have fun.

Thursday, November 5, 2009

Flushing Pheasants


Flushing Pheasants.
Also thanks so much for the nice comments. Petra is actually is for you! My brothers wife can use it and evidently a few other gals. Have fun.

Monday, November 2, 2009

Judith Wordart Freebie

  The Perfect Storm Word art.
The North Wind doth blow Word art.
This is in 3 separate files, so you could use them individually also.
  Silent and Soft word art.

Sunday, November 1, 2009

Creepy Alpha

Creepy Alpha.

Saturday, October 31, 2009

Happy Halloween

Happy Halloween  I just loved how the white frame popped of the dark purple. Have fun.

Thursday, October 29, 2009

Stenciled Alpha

  Stenciled Alpha.

Wednesday, October 28, 2009

Twenty years from now.

Twenty years from now... by Judith. And thanks for the nice comments. My brother is a hunter, so he probably has all I need to add the requested pheasants.

The earth is the cradle...

The earth is the cradle... by Judith.

Once you have flown...


Once you have flown Wordart.
These are all made by Judith. Thanks to her for sharing them with us. I'm sorry that I forgot to include the mention in the preview. My minds somewhere else this morning.

Sunday, October 25, 2009

Thursday, October 22, 2009

Autumn Window Wordart


Autumn Window Wordart. Judith left all the words in individual files, so that they can be arranged separately or used alone.

Wednesday, October 21, 2009

Monday, October 19, 2009

Animation in Photoshop Elements 3

Someone asked me for a blinkie about a month ago. I was painting the house at the time and told her I would do it when I had a bit more time. I write the lessons for my kids, one of them has Photoshop 3. I searched for a tutorial to make a blinkie in Elements 3, to no avail. In the attempt to make a blinkie, well you can see were it ended up. (Yes Barb, you can do this in CS3). So if you have a blog or online photo album and would like to try this.....
  1. When you have a layout finished, save this a .psd (preserves the layers) and remember to save your work as you go, a new file name each time is a good safeguard, don't merge all the layers.
  2. In the layers palette, click off the little eye of the element(s) you would like to move.
  3. Now click Layers, merge visible. Turn the shuttle layer back on, and I sized it very small to start the journey.
  4. For the shuttle, I added a new layer below the shuttle, and with a cloud brush and a light grey, stamped the exhaust. This background provided enough contrast of darks. Now link or lock the shuttle and exhaust together and Layer>merge linked.
  5. For the text layer, the words were spaced 4 times, so that it ran off the page and could run across the bottom of the page.
  6. I had 18 finished layers in the preview, but it should probably have about 30-40 to seem smoother. So duplicate the background layer (I don't think you don't have to do this in CS), the shuttle layer and the text.
  7. Click the eye in the layers palette, so that you don't see the duplicated background.
  8. Click on your move tool and using the arrow on your keyboard, shift the text left 5 spaces.
  9. The shuttle is than increased in size, by pulling the bottom right corner, and locking the dimension at 125 %. This probably could have been a bit smaller, to add more layers. When the image is now offset just a bit for the motion. As the shuttle got larger, I added a new layer beneath the shuttle and added a bit more exhaust.
  10. Now you can click that background back on.
  11. Repeat steps 6-10 until you are satisfied with the results. (You can have as many layers as you want).
  12. Save your work. Now you will start merging the layers, so click on one background and the text and shuttle directly above it. Click layers, merge linked.
  13. Now to prepare it for your blog. Click Image>resize image> (I set) the height and width to 4 inches and set the resolution to 72 dpi.
  14. Click File>Save for Web>click animation (be sure it is set to .gif). The default for the frame delay was 0.2, I didn't change this. And give it a new name.
  15. Now you must use a photo sharing site to post it in your blog. I used Photo bucket, and they have an easy way to post it blogspot. (I"ll try to get it written to a DVD to see if it'll play.)
Barb, you should have program with CS called Image Ready. I'm fairly certain that it keeps the background in all the images, element didn't. It's probably on the left bottom in your tools palette. You will actually we able to preview your animation.
You can do this with anything you want to put in motion. Fall leaves rustling across the page. Bubbles from the tub, a ball at the beach. Think big and always have fun!

Autumn is a mellower season Wordart


Autumn is a mellower season Word art.
Thank you Judith!

Autumn Harmony Wordart


Autumn Harmony Wordart.

Sunday, October 18, 2009

Tombstone


Tombstone.  You are all so welcome. Thank you.

Friday, October 16, 2009

When I am not at the Ocean


When I am not at the Ocean Wordart.
Thank you Judith! I also loaded the Varsity Alpha in Orange with Black. And the templates were loaded in case you would like to match your local schools.

Come said the wind


Come said the Wind. This was made from the Red Grunge Alpha.

Tuesday, October 13, 2009

Final Frontier


Final Frontier. Our grandchildren love to look through the telescope with grandpa, they usually can't stay up late enough to see anything except the moon. Fortunately, I can still get pictures of them together, doing this. So a visit to NASA and my layouts done. I set up the account at 4share, and think I have the direct linking down!

Monday, October 12, 2009

Touchdown and Scoreboard Template


The Scoreboard is not included in the Elements, it is a template. Download Touch Down. (new link 1/3/11 and thanks for alerting me!)  and Touch Down Scoreboard Template.
  1. To use the Scoreboard template, open the file.
  2. Select the color you wish to use and fill the Background color layer.
  3. Each of the numbers are included, if you prefer to type your stats, click the little eye in the layers palette off, for every number.
  4. Position the number in the appropriate box. To use the number again in another box, click Layer>Duplicate layer. And move it to the needed positon.
  5. When you are finished, be sure to click the eye off for any used numbers.
  6. Click Layer>merge visible and drag into your layout. (Forgot something, click Edit>undo merge visible). Have fun.

Saturday, October 10, 2009

Newspaper Alpha


Newspaper Alpha and the Lower Case w/Numbers.

Friday, October 9, 2009

Varsity Alpha


I will post other colors here, as I make them.
Download Varsity Alpha in Red/ Black.
Download Varsity Alpha in Green/Grey.
Download Varsity Alpha in Blue/Black.
Download Varsity Alpha in Black.
Download Varsity Alpha in Orange/Black.

Thursday, October 8, 2009

Photoshop Lesson


So I thought we'd start using some of the filters that you have. I have layed out the lesson in the preview. Right click on the mouse, and save image (if you want to keep it on your computer). This takes me about 1 minute, if you are new to the program, maybe 2 or 3 minutes.
  1. First drag any flat ribbon into your layout (the ribbon file won't have enough room to distort the ribbon.)
  2. Click Filter>Layer>Distort>Pinch, in this lesson I have set it to 15%, and click ok. (At the top of the screen).
  3. Repeat this 2 more times, for a total of 3 times.
  4. Select your eraser tool, from one corner click eraser and HOLDING THE SHIFT KEY, click to a center point, and than to the other corner.
  5. Now erase the remaing pixels and you have cut a nice edge in your ribbon.
  6. Add drop shadow and you are finished.

Wednesday, October 7, 2009

Monday, October 5, 2009

Autumn Corn


Autumn Corn. I had bought this and thought that some of you might like to use it in your fall pages.

Sunday, October 4, 2009

Time and Tide Word Art

Time and Tide Word Art. Judith has been sending some of her word art. In the preview is shown, that if you wish to change the layer style, you can use the word art for multiple projects. Note that it change the color depending on the background, so the image picks up the color of the paper. This is also a good way to use one alpha in a variety of ways and achieve different results. Remember to have fun.

Falling Leaves Alpha

Falling Leaves Alpha.