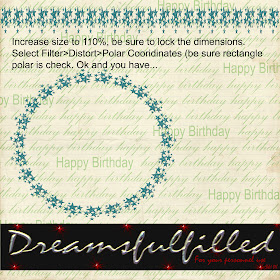
I missed the opportunity to post this, so here we go. You can use any straight element (ribbons and borders) and turn it into a frame or place for your journaling with the polar coordinates filter. If you right click and you can save the photo to your computer (if you want).
- Open a new layout, it really should be 12 x 12 inches, so that there is enough room for the filter to work properly.
- Click Filter>Distort>Polar Coordinates (at the top) and you are done.
- HOWEVER, some elements are not wide enough to connect properly, as was the case of the barbed wire frame, since I was layering them, I just turned the second layer a bit and covered the small gap. BUT if you are not doing that, to correct the gap increase the file to 110% and lock the dimensions together and run the filter in step 2.
- Have fun.
 I missed the opportunity to post this, so here we go. You can use any straight element (ribbons and borders) and turn it into a frame or place for your journaling with the polar coordinates filter. If you right click and you can save the photo to your computer (if you want).
Wow, thank you for this! These little tutorials of yours really help doing all these little tricks. I appreciate it so much. I tried it with the barb wire from the western bound kit. Works great!
ReplyDeleteThank you soooo much for your 'tricks of the trade'! These are as great as your kits!
ReplyDeleteThank you so much for this Freebie. I want to let you know that I posted a link to your blog in CBH Digital Scrapbooking Freebies, under the Page 1 post on Nov. 11, 2009. Thanks again.
ReplyDeleteThank you so much. You have some wonderful things on your blog!
ReplyDeleteSus
I am so glad you include a tutorial here and there. I have a lot to learn. Your presence is known. Love n hugs. Thank you
ReplyDelete